
CIDR Request Data – Spatial Requirements
CIDR Request Data – Spatial Requirements
The Request Data (link in the Menu bar) tool provides the option to assist U.S. Federal Civil agencies to enter near-term land remote sensing data requirements and provides an interface to place new Data Acquisition Requests (DARs). There are four sections within Request Data to acquire the desired data. Click information icon for more definitions/information per entry box. (Figure 1)
The requirements for requesting data:
| Required | Optional |
|---|---|
| Active EROS Registration System Account Project Description/Justification Data Use and Sharing Archived Imagery Needed (Y/N) Type of Sensor Type of Product (MSI, PAN, SAR, Other) Acquisition Start Date Acquisition End Date Publicly Viewable DAR (Y/N) Collection Strategy Spatial Information | Spacecraft Processing Level Output Format |
A. Request Details
B. Imaging Requirements
C. Spatial Requirements
D. Submit Request
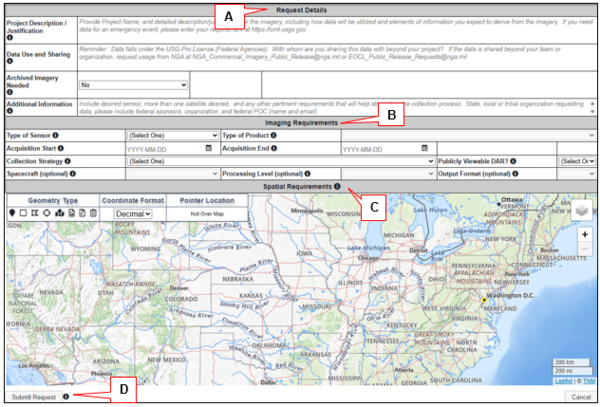
Figure 1: Request Data Tool
C. Spatial Requirements – Users must define the Area of Interest (AOI) using the map and provided tools. Be cautious of the AOI and refrain from asking for large areas. Refer to the commercial reference sheet to see area size. (Figure 2)
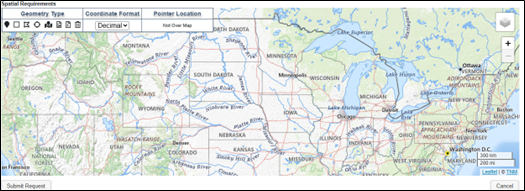
Figure 2: Spatial Requirements
Refer to the commercial reference sheet to see area size.
| Sensor | Vendor | Spectrum/Polarization | Point Size | Area Size | Best Resolution | Access | Tasking | Delivery | Contact |
|---|---|---|---|---|---|---|---|---|---|
| EO | MAXAR (WV1, WV2, WV3) | PAN/MSI/SWIR | 13 X 13km | Best: 25 x 40km | PAN: 0.31m MSI: 1.24m SWIR: 3.7m | 90N/90S | Yes, through; CIDR (Science/Research) CMT (Hazards) | Earthexplorer HDDS G-EGD | EOCL (NRO) |
| EO | Blacksky | PAN/MSI | 4 x 4km | NA | 0.85m | 55N/55S | Yes, through; CIDR (Science/Research) CMT (Hazards) | G-EGD | EOCL (NRO) |
| EO | Planet Skysat | PAN/MSI | 6 x 6km | Best: 12 x 12km | 0.50m | 81N/84S | Yes, through; CIDR (Science/Research) CMT (Hazards) | G-EGD | EOCL (NRO) |
| EO | Planet Doves | PAN/MSI | NA | NA | 3m | 81N/81S | No, always collecting. Reach out to Planet PMO; planetpmo@nga.mil | Email: planetpmo@nga.mil | EOCL (NRO) |
| SAR | Capella | VV or HH | 5 x 5km | Max: 5 x 20km | 0.25m | 90N/90S | Yes, through; CIDR (Science/Research) CMT (Hazards) | G-EGD | SCE/CRC (NRO) |
| SAR | ICEYE (US) | VV or HH | 5 x 5km | Max: 30 x 50km | 0.5m | 90N/90S | Yes, through; CIDR (Science/Research) CMT (Hazards) | G-EGD | SCE/CRC (NRO) |
| SAR | Umbra | VV or HH | 5 x 5km | NA | 0.25m | 90N/90S | Yes, through; CIDR (Science/Research) CMT (Hazards) | G-EGD | SCE/CRC (NRO) |
| SAR | RADARSAT | Single: HH or VV Dual: HH+HV or VV+VH Quad: HH+VV+HV+VH | 4 x 4km | Max: 500 x 500km | 1m | 90N/90S | Yes, through; CIDR (Science/Research) CMT (Hazards) | NorthernView (NGA) |
Navigation -- Tools for navigating the map
- Layers – Click the Layers icon to change the base layer for viewing, upper right on map.
- Zoom - click the plus sign (+) to zoom in; click the minus sign (–) to zoom out. The mouse scroll wheel can also be used to zoom in or out.
- Pan - click and drag the map to the desired location or view.
Coordinate Format – Users have the option of choosing to display the coordinates in Decimal or Degrees, Minutes, Seconds (DMS) from the upper left middle box on map.
Pointer Location – As the mouse is scrolled over the coordinates are displayed within the Pointer Location box. Depending on the Coordinate Format selected the location will display in Decimal or Degrees, Minutes, or Seconds.
Geometry Type – Users can define AOI using Point, Bounding Box, Multi-Point Polygon, Circle, Predefined Area (within the United States), KML Upload, or Shapefile Upload. The trash icon can be used at any time to clear the map. Utilize the icons in the upper left corner of the map. Descriptions of the icons left to right are listed below.
Point -- Select Point from the Geometry Type toolbar. Click an area on the map once using the mouse to define a single point search. The Latitude and Longitude can also be entered manually. Expand the Show Options window. Enter coordinates in decimal degrees then click on Set Point.
- Bounding Box - To define a geographic location by creating a box, select Bounding Box from the Geometry Type toolbar. The latitude and longitude for the upper left corner and the lower right corner can also be entered manually. Expand the Show Options window. Enter coordinates for opposite corners of a box in decimal degrees then click on Set Point. (Figure 3)
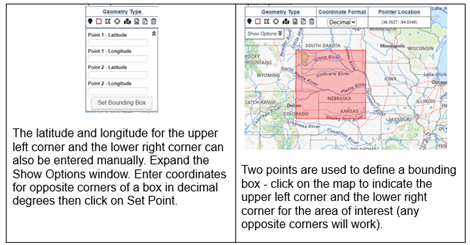
Figure 3: Bounding Box
- Multi-Point Polygon - To define a geographic location by creating a polygon, select Multi-Point Polygon from the Geometry Type toolbar. (Figure 4)
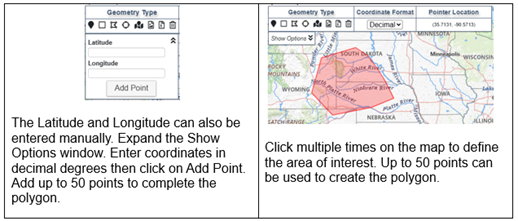
Figure 4: Multi-Point Polygon
- Circle - To define a geographic location by creating a circle, select Circle from the Geometry Type toolbar. (Figure 5)
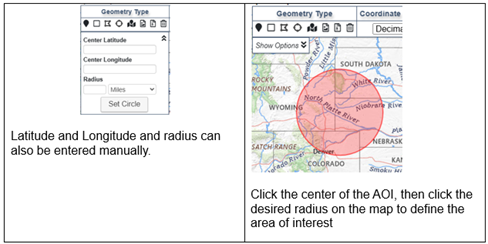
Figure 5: Circle
- Pre-defined Area - To define a geographic location using a pre-defined boundary (within the United States), select Pre-defined Area from the Geometry Type toolbar. (Figure 6)

Figure 6: Predefined Area
- KML Upload and Shapefile Upload - To define a geographic location using a KML file or Shapefile, select KML Upload or Shapefile Upload from the Geometry Type toolbar. (Figure 7)
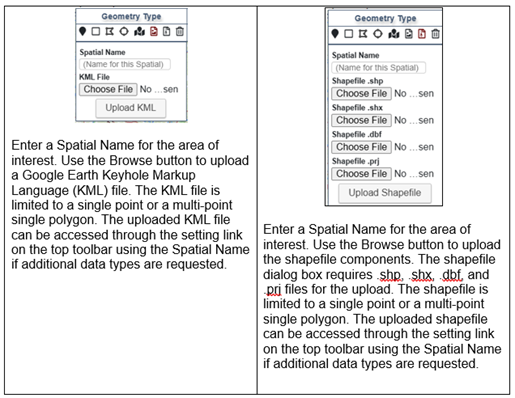
Figure 7: KML or Shapefile Upload
- Clear Geometry -- Click the garbage can icon to clear the geometry currently selected from any type of geometric selection.
CIDR Request Data – Spatial Requirements
The Request Data (link in the Menu bar) tool provides the option to assist U.S. Federal Civil agencies to enter near-term land remote sensing data requirements and provides an interface to place new Data Acquisition Requests (DARs). There are four sections within Request Data to acquire the desired data. Click information icon for more definitions/information per entry box. (Figure 1)
The requirements for requesting data:
| Required | Optional |
|---|---|
| Active EROS Registration System Account Project Description/Justification Data Use and Sharing Archived Imagery Needed (Y/N) Type of Sensor Type of Product (MSI, PAN, SAR, Other) Acquisition Start Date Acquisition End Date Publicly Viewable DAR (Y/N) Collection Strategy Spatial Information | Spacecraft Processing Level Output Format |
A. Request Details
B. Imaging Requirements
C. Spatial Requirements
D. Submit Request
Figure 1: Request Data Tool
C. Spatial Requirements – Users must define the Area of Interest (AOI) using the map and provided tools. Be cautious of the AOI and refrain from asking for large areas. Refer to the commercial reference sheet to see area size. (Figure 2)
Figure 2: Spatial Requirements
Refer to the commercial reference sheet to see area size.
| Sensor | Vendor | Spectrum/Polarization | Point Size | Area Size | Best Resolution | Access | Tasking | Delivery | Contact |
|---|---|---|---|---|---|---|---|---|---|
| EO | MAXAR (WV1, WV2, WV3) | PAN/MSI/SWIR | 13 X 13km | Best: 25 x 40km | PAN: 0.31m MSI: 1.24m SWIR: 3.7m | 90N/90S | Yes, through; CIDR (Science/Research) CMT (Hazards) | Earthexplorer HDDS G-EGD | EOCL (NRO) |
| EO | Blacksky | PAN/MSI | 4 x 4km | NA | 0.85m | 55N/55S | Yes, through; CIDR (Science/Research) CMT (Hazards) | G-EGD | EOCL (NRO) |
| EO | Planet Skysat | PAN/MSI | 6 x 6km | Best: 12 x 12km | 0.50m | 81N/84S | Yes, through; CIDR (Science/Research) CMT (Hazards) | G-EGD | EOCL (NRO) |
| EO | Planet Doves | PAN/MSI | NA | NA | 3m | 81N/81S | No, always collecting. Reach out to Planet PMO; planetpmo@nga.mil | Email: planetpmo@nga.mil | EOCL (NRO) |
| SAR | Capella | VV or HH | 5 x 5km | Max: 5 x 20km | 0.25m | 90N/90S | Yes, through; CIDR (Science/Research) CMT (Hazards) | G-EGD | SCE/CRC (NRO) |
| SAR | ICEYE (US) | VV or HH | 5 x 5km | Max: 30 x 50km | 0.5m | 90N/90S | Yes, through; CIDR (Science/Research) CMT (Hazards) | G-EGD | SCE/CRC (NRO) |
| SAR | Umbra | VV or HH | 5 x 5km | NA | 0.25m | 90N/90S | Yes, through; CIDR (Science/Research) CMT (Hazards) | G-EGD | SCE/CRC (NRO) |
| SAR | RADARSAT | Single: HH or VV Dual: HH+HV or VV+VH Quad: HH+VV+HV+VH | 4 x 4km | Max: 500 x 500km | 1m | 90N/90S | Yes, through; CIDR (Science/Research) CMT (Hazards) | NorthernView (NGA) |
Navigation -- Tools for navigating the map
- Layers – Click the Layers icon to change the base layer for viewing, upper right on map.
- Zoom - click the plus sign (+) to zoom in; click the minus sign (–) to zoom out. The mouse scroll wheel can also be used to zoom in or out.
- Pan - click and drag the map to the desired location or view.
Coordinate Format – Users have the option of choosing to display the coordinates in Decimal or Degrees, Minutes, Seconds (DMS) from the upper left middle box on map.
Pointer Location – As the mouse is scrolled over the coordinates are displayed within the Pointer Location box. Depending on the Coordinate Format selected the location will display in Decimal or Degrees, Minutes, or Seconds.
Geometry Type – Users can define AOI using Point, Bounding Box, Multi-Point Polygon, Circle, Predefined Area (within the United States), KML Upload, or Shapefile Upload. The trash icon can be used at any time to clear the map. Utilize the icons in the upper left corner of the map. Descriptions of the icons left to right are listed below.
Point -- Select Point from the Geometry Type toolbar. Click an area on the map once using the mouse to define a single point search. The Latitude and Longitude can also be entered manually. Expand the Show Options window. Enter coordinates in decimal degrees then click on Set Point.
- Bounding Box - To define a geographic location by creating a box, select Bounding Box from the Geometry Type toolbar. The latitude and longitude for the upper left corner and the lower right corner can also be entered manually. Expand the Show Options window. Enter coordinates for opposite corners of a box in decimal degrees then click on Set Point. (Figure 3)
Figure 3: Bounding Box
- Multi-Point Polygon - To define a geographic location by creating a polygon, select Multi-Point Polygon from the Geometry Type toolbar. (Figure 4)
Figure 4: Multi-Point Polygon
- Circle - To define a geographic location by creating a circle, select Circle from the Geometry Type toolbar. (Figure 5)
Figure 5: Circle
- Pre-defined Area - To define a geographic location using a pre-defined boundary (within the United States), select Pre-defined Area from the Geometry Type toolbar. (Figure 6)
Figure 6: Predefined Area
- KML Upload and Shapefile Upload - To define a geographic location using a KML file or Shapefile, select KML Upload or Shapefile Upload from the Geometry Type toolbar. (Figure 7)
Figure 7: KML or Shapefile Upload
- Clear Geometry -- Click the garbage can icon to clear the geometry currently selected from any type of geometric selection.