GloVis Short and Simple Tutorial
Since 2001, the USGS Global Visualization Viewer (GloVis) has been used to easily view, order, and download remotely sensed data. The GloVis Tour covers the basic steps for navigating through the website. The Short and Simple Help Document supplements the tour and highlights key features for setting up a search and accessing data. The full Help Document is under development and will provide an extensive explanation of all features.
1. Registration and Login
GloVis utilizes the USGS EROS Registration System (ERS) and can be accessed with existing GloVis or EarthExplorer credentials. The ERS Help Document has step-by-step instructions on the registration process. To set up new credentials, click Create New Account to register. Select Login on the top toolbar. Enter your username and password and then click Sign In to access all features of GloVis.
Downloads from the Land Processes Distributed Active Archive Center (LP DAAC) now require Earthdata Login authentication. Please see the LP DAAC News announcement or click here to authorize the LP DAAC Data Pool application for existing Earthdata Login credentials. Please note that due to this modification, bulk download will no longer be available for LP DAAC products.
Contact Customer Services with any questions regarding the registration process or to report errors or provide feedback on the site.
2. Select Data Set(s) and Apply Filters
Navigate GloVis by using the Interface Controls panel on the left side of the screen. This panel provides options to set up a data search.
A. Choose Your Data Set(s)
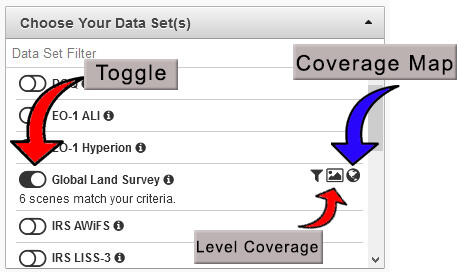
To begin, select a data set from the Choose Your Data Set menu. Simply toggle the data set on to activate and save the selection.

The total number of available scenes is listed below the data set name and the map view shows a coverage map to indicate availability of data. The coverage map for each data set is a different color. The coverage map can be turned off by clicking the globe icon.
B. Metadata Filter
The Metadata Filter provides options that narrow search results. Update one or more filters, then click Apply to save all selections and view the matching scenes.
1. Filter data temporally by Date Range using mm/dd/yyyy to mm/dd/yyyy.
2. Enter a Cloud Cover range to narrow the results based on the percentage (0-100%) of the scene covered by clouds. Leave this filter empty for data sets that do not report cloud cover such as GLS.
3. Select Months to further limit search results to scenes acquired during a portion of the year. To select more than one month, hold down the Shift or Ctrl keys while selecting additional rows.
Click the triangle in the upper right of the header to collapse the menu.

3. Define Area of Interest
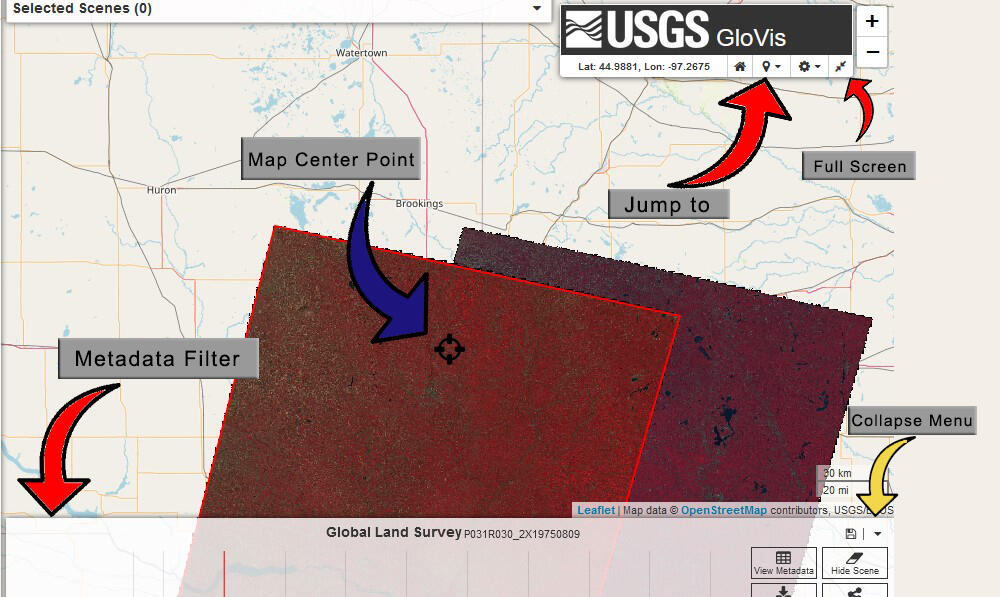
The next step is to define the geographic area of interest. To select a location, click and drag the map to pan and scroll to zoom into your area of interest or utilize the Jump To menu in the upper right of the map. As the zoom function is activated, the display shows browse images that intersect the Map Center Point crosshair in the center of the viewport. To see data behind the Interface Controls, click the triangle in the upper right of that panel to collapse the panel. As the mouse moves across the map, the coordinates are displayed in decimal degrees in the upper right portion of the map view area. The Full Screen mode can be enabled to view the map in Full Screen mode.
A. Pan and Zoom
Use the mouse scroll wheel or the +/- controls in the upper right corner of the map view to activate the browse imagery display or to enlarge the browse images. The zoom level required to activate browse images depends on scene size and varies by data set.
Pan to adjacent areas by clicking and dragging the map. If the zoom level allows imagery to display, the data sets automatically refresh.
B. Jump To Options
The Jump To… menu, in the upper right of the map field, provides the opportunity to use Current Location, Latitude/Longitude, or WRS Path/Row to select a location. The Current Location shifts the center point of the map to the current physical browser location once the browser is given permission to share the current location with the GloVis site.
As the area of interest is modified, each data set updates the count of scenes that match the current criteria. The browse level coverage map icon can be toggled on to indicate availability of data.
4. Scene Navigation and Selection
The Scene Navigator panel appears near the lower right portion of the screen when browse images are loaded. The Scene Navigator shows the Data Set, Entity ID, and Acquisition date of the most recent scene. The current scene is depicted with a red outline and is displayed on top of all other browse images. For the visually impaired, the color of the outline can be changed in the Map Preferences section of the Preferences menu.
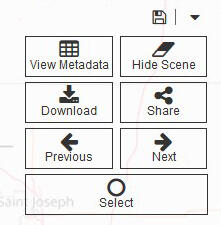
Scenes are arranged by acquisition date. The Previous button selects and highlights the next most recent scene. Use the Previous and Next buttons to scroll through the results. The display uses a rolling display of browse images closest to the acquisition date of the current scene.
The Select button adds a scene to the Selected Scenes list just below the black toolbar across the top of the map view. Once a scene has been selected, click Unselect to remove it from the Selected Scenes.

5. Scene Navigator Controls
The Scene Navigator panel also includes icons to Share Scene, View Metadata, Download Scene, and Hide Scene. Login is required for downloading.
A. The Share Scene icon opens a menu with options for Scene Summary, Metadata XML, and Reduced Resolution Browse.
1. Scene Summary opens a new browser tab which shows the browse image, links to download available products, full metadata for the current scene, and links to order products (WMS On-Demand and Bulk Download) if options are available.
2. Metadata XML opens a new tab with the scene xml metadata.
3. Reduced Resolution Browse opens a new tab with a larger browse image.
B. Click the View Metadata icon to display the full metadata for the current scene. The data set attributes are displayed in table format.
C. Click the Download Scene icon to see download options for the current scene. Click Download Scene for the desired product to download the data. Download options and products vary by data set.
D. Click the Hide Scene icon to hide the current scene from the list and remove it from the map. The number of Hidden scenes is indicated by a counter next to the data set name in the Interface Controls panel. Click on the counter to clear hidden scenes to make them available for display again.
6. Scene List
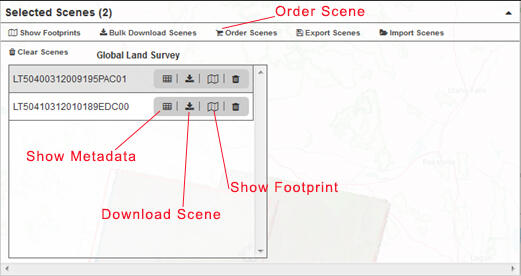
Go to Selected Scenes at the top of the map view to view the scene list that was created by selecting scenes in the Scene Navigator panel.

A. Individual Scene Controls
The scene list shows the Data Set and Entity ID for each scene. Individual Scene Controls include Show Metadata , Download Scene, Order Scene, or Show Footprint . Download and Order options vary by data set.
B. Scene List Controls
The selected scenes panel allows users to Show All Footprints, Export Scene ID List, Import Scene List, or Clear All Scenes. Download and Order options vary by data set. The Export Scene List and Import Scene List are functions of GloVis only.
7. Preferences
The Preferences menu on the top toolbar provides options to activate additional features and change default settings. (Login is required to access Preferences.) All preferences are covered in the full Help Document; however, some of the most helpful features are highlighted in this section.
A. General Preferences
Two of the most useful options on the General Preferences menu are Enable Reference Layer Panel and Rolling Browse.
1. Default Data Set determines which data sets to use when first loading GloVis.
2. Enable Reference Layer Panel enables the ability to display and use the Reference Layers panel. Once activated, the following options will display on the Interface Controls panel:
a. Add New KML/Shapefile provides the option to upload a KML/KMZ or shapefile. The shapefile upload allows for the input of a zip file containing .shp, .shx, .dbf, and .prj files. These layers are for reference and do not define an area of interest for a search.
b. Use a Placename Search to locate an area of interest. This option provides a menu of possible matches and will zoom to the specified location.
c. Draw a Polygon to help identify availability of data over an area of interest. The polygon is only a reference layer and search results will continue to be based on the area defined by the Viewport.
d. Toggle the USGS Imagery Topo Basemap to display a topographic basemap in place of the open street map.
e. The Configure Layer, next to the Predefined Layers, displays an option to position the system and user-defined WMS layers above or below the scene imagery.
3. Rolling Browse changes the number of browse images to show on the map display, before and after the current scene, while navigating through scenes. The default number is 1 scene. Other options are None, 1, 10, or 25.
Select Apply Changes to save the General Preferences. Click Home on the top toolbar to return to the Viewport. Select Reset to Default to change General Preferences back to their original settings.
B. Map Preferences
The Map Preferences menu provides the option to change the Default Location. The location and zoom level of the Viewport upon opening GloVis is customizable.
1. The Center Point option allows users to Change Location by entering a new Latitude and Longitude or by moving the pointer on the map. Zoom and pan controls allow for easy navigation on the Change Default Location Map. The Location icon () can also be used to shift the center point to the current physical location if the browser is allowed to share the location.
2. The Zoom Level determines the level of map detail upon loading GloVis. The default setting opens the map to zoom level 3. Increase this value to see a smaller area of interest with greater detail when the GloVis application is opened.
Select Apply Changes to save the Map Preferences. Click Home on the top toolbar to return to the Viewport. Select Reset to Default to change Map Preferences back to their original settings.
8. Customer Assistance
Please use the Feedback link on the top toolbar to report errors or provide other feedback on the site.
Customer Services representatives can be reached Monday through Friday, 8:00 a.m. to 4:00 p.m., Central Time by phone at 605-594-6151 or 1-800-252-4547 and by email at custserv@usgs.gov.
Since 2001, the USGS Global Visualization Viewer (GloVis) has been used to easily view, order, and download remotely sensed data. The GloVis Tour covers the basic steps for navigating through the website. The Short and Simple Help Document supplements the tour and highlights key features for setting up a search and accessing data. The full Help Document is under development and will provide an extensive explanation of all features.
1. Registration and Login
GloVis utilizes the USGS EROS Registration System (ERS) and can be accessed with existing GloVis or EarthExplorer credentials. The ERS Help Document has step-by-step instructions on the registration process. To set up new credentials, click Create New Account to register. Select Login on the top toolbar. Enter your username and password and then click Sign In to access all features of GloVis.
Downloads from the Land Processes Distributed Active Archive Center (LP DAAC) now require Earthdata Login authentication. Please see the LP DAAC News announcement or click here to authorize the LP DAAC Data Pool application for existing Earthdata Login credentials. Please note that due to this modification, bulk download will no longer be available for LP DAAC products.
Contact Customer Services with any questions regarding the registration process or to report errors or provide feedback on the site.
2. Select Data Set(s) and Apply Filters
Navigate GloVis by using the Interface Controls panel on the left side of the screen. This panel provides options to set up a data search.
A. Choose Your Data Set(s)
To begin, select a data set from the Choose Your Data Set menu. Simply toggle the data set on to activate and save the selection.

The total number of available scenes is listed below the data set name and the map view shows a coverage map to indicate availability of data. The coverage map for each data set is a different color. The coverage map can be turned off by clicking the globe icon.
B. Metadata Filter
The Metadata Filter provides options that narrow search results. Update one or more filters, then click Apply to save all selections and view the matching scenes.
1. Filter data temporally by Date Range using mm/dd/yyyy to mm/dd/yyyy.
2. Enter a Cloud Cover range to narrow the results based on the percentage (0-100%) of the scene covered by clouds. Leave this filter empty for data sets that do not report cloud cover such as GLS.
3. Select Months to further limit search results to scenes acquired during a portion of the year. To select more than one month, hold down the Shift or Ctrl keys while selecting additional rows.
Click the triangle in the upper right of the header to collapse the menu.

3. Define Area of Interest
The next step is to define the geographic area of interest. To select a location, click and drag the map to pan and scroll to zoom into your area of interest or utilize the Jump To menu in the upper right of the map. As the zoom function is activated, the display shows browse images that intersect the Map Center Point crosshair in the center of the viewport. To see data behind the Interface Controls, click the triangle in the upper right of that panel to collapse the panel. As the mouse moves across the map, the coordinates are displayed in decimal degrees in the upper right portion of the map view area. The Full Screen mode can be enabled to view the map in Full Screen mode.
A. Pan and Zoom
Use the mouse scroll wheel or the +/- controls in the upper right corner of the map view to activate the browse imagery display or to enlarge the browse images. The zoom level required to activate browse images depends on scene size and varies by data set.
Pan to adjacent areas by clicking and dragging the map. If the zoom level allows imagery to display, the data sets automatically refresh.
B. Jump To Options
The Jump To… menu, in the upper right of the map field, provides the opportunity to use Current Location, Latitude/Longitude, or WRS Path/Row to select a location. The Current Location shifts the center point of the map to the current physical browser location once the browser is given permission to share the current location with the GloVis site.
As the area of interest is modified, each data set updates the count of scenes that match the current criteria. The browse level coverage map icon can be toggled on to indicate availability of data.
4. Scene Navigation and Selection
The Scene Navigator panel appears near the lower right portion of the screen when browse images are loaded. The Scene Navigator shows the Data Set, Entity ID, and Acquisition date of the most recent scene. The current scene is depicted with a red outline and is displayed on top of all other browse images. For the visually impaired, the color of the outline can be changed in the Map Preferences section of the Preferences menu.
Scenes are arranged by acquisition date. The Previous button selects and highlights the next most recent scene. Use the Previous and Next buttons to scroll through the results. The display uses a rolling display of browse images closest to the acquisition date of the current scene.
The Select button adds a scene to the Selected Scenes list just below the black toolbar across the top of the map view. Once a scene has been selected, click Unselect to remove it from the Selected Scenes.

5. Scene Navigator Controls
The Scene Navigator panel also includes icons to Share Scene, View Metadata, Download Scene, and Hide Scene. Login is required for downloading.
A. The Share Scene icon opens a menu with options for Scene Summary, Metadata XML, and Reduced Resolution Browse.
1. Scene Summary opens a new browser tab which shows the browse image, links to download available products, full metadata for the current scene, and links to order products (WMS On-Demand and Bulk Download) if options are available.
2. Metadata XML opens a new tab with the scene xml metadata.
3. Reduced Resolution Browse opens a new tab with a larger browse image.
B. Click the View Metadata icon to display the full metadata for the current scene. The data set attributes are displayed in table format.
C. Click the Download Scene icon to see download options for the current scene. Click Download Scene for the desired product to download the data. Download options and products vary by data set.
D. Click the Hide Scene icon to hide the current scene from the list and remove it from the map. The number of Hidden scenes is indicated by a counter next to the data set name in the Interface Controls panel. Click on the counter to clear hidden scenes to make them available for display again.
6. Scene List
Go to Selected Scenes at the top of the map view to view the scene list that was created by selecting scenes in the Scene Navigator panel.

A. Individual Scene Controls
The scene list shows the Data Set and Entity ID for each scene. Individual Scene Controls include Show Metadata , Download Scene, Order Scene, or Show Footprint . Download and Order options vary by data set.
B. Scene List Controls
The selected scenes panel allows users to Show All Footprints, Export Scene ID List, Import Scene List, or Clear All Scenes. Download and Order options vary by data set. The Export Scene List and Import Scene List are functions of GloVis only.
7. Preferences
The Preferences menu on the top toolbar provides options to activate additional features and change default settings. (Login is required to access Preferences.) All preferences are covered in the full Help Document; however, some of the most helpful features are highlighted in this section.
A. General Preferences
Two of the most useful options on the General Preferences menu are Enable Reference Layer Panel and Rolling Browse.
1. Default Data Set determines which data sets to use when first loading GloVis.
2. Enable Reference Layer Panel enables the ability to display and use the Reference Layers panel. Once activated, the following options will display on the Interface Controls panel:
a. Add New KML/Shapefile provides the option to upload a KML/KMZ or shapefile. The shapefile upload allows for the input of a zip file containing .shp, .shx, .dbf, and .prj files. These layers are for reference and do not define an area of interest for a search.
b. Use a Placename Search to locate an area of interest. This option provides a menu of possible matches and will zoom to the specified location.
c. Draw a Polygon to help identify availability of data over an area of interest. The polygon is only a reference layer and search results will continue to be based on the area defined by the Viewport.
d. Toggle the USGS Imagery Topo Basemap to display a topographic basemap in place of the open street map.
e. The Configure Layer, next to the Predefined Layers, displays an option to position the system and user-defined WMS layers above or below the scene imagery.
3. Rolling Browse changes the number of browse images to show on the map display, before and after the current scene, while navigating through scenes. The default number is 1 scene. Other options are None, 1, 10, or 25.
Select Apply Changes to save the General Preferences. Click Home on the top toolbar to return to the Viewport. Select Reset to Default to change General Preferences back to their original settings.
B. Map Preferences
The Map Preferences menu provides the option to change the Default Location. The location and zoom level of the Viewport upon opening GloVis is customizable.
1. The Center Point option allows users to Change Location by entering a new Latitude and Longitude or by moving the pointer on the map. Zoom and pan controls allow for easy navigation on the Change Default Location Map. The Location icon () can also be used to shift the center point to the current physical location if the browser is allowed to share the location.
2. The Zoom Level determines the level of map detail upon loading GloVis. The default setting opens the map to zoom level 3. Increase this value to see a smaller area of interest with greater detail when the GloVis application is opened.
Select Apply Changes to save the Map Preferences. Click Home on the top toolbar to return to the Viewport. Select Reset to Default to change Map Preferences back to their original settings.
8. Customer Assistance
Please use the Feedback link on the top toolbar to report errors or provide other feedback on the site.
Customer Services representatives can be reached Monday through Friday, 8:00 a.m. to 4:00 p.m., Central Time by phone at 605-594-6151 or 1-800-252-4547 and by email at custserv@usgs.gov.

